What skills have you developed through this module and how effectively do you think you have applied them?
My skills towards print have vastly improved throughout this module. I now find myself thinking and looking in different ways than I have done previously, and now that I have a better understanding of how to actually go about commercial printing and how it actually works as opposed to just printing at home or in the digital dungeon I feel a lot more confident and ready to be able to go ahead and actually produce something that could be commercially printed. Also, I have focused a lot within my development skills throughout this project which is something I will certainly carry on with in the future as I found just going about the actual design of what I was doing a lot easier once I had it down on paper.
What Approaches to/methods of design production have you developed and how have they informed your design development process?
I have learnt how I would go about designing for commercial printing, right from setting up a document through to sending it off to print. I now understand the actual technical side behind it which is definitely a good piece of knowledge to have as both design and print wrk hand in hand in order to produce something that is successful and also serves a purpose. I find myself questioning a lor of the time now how things may have been printed, which is something that I haven't really done before but is certainly something I would like to get good at.
What strengths can you identify in your work and how have/will you capitalise on these?
I think my development work throughout this project has vastly improved since last year. I forced myself to do a lot more development work than I have done in previous modules and I think it paid off as I feel a lot happier with my final outcomes and believe the Good Is... brief has come together a lot better for it. By sketching down my ideas, and pushing the digital designing aspect further meant I could really focus into what I was doing ensuring that it works in the way I am intending it to as opposed to just making something look nice.
What weaknesses can you identify in your work and how will you address these in the future?
My weakness throughout this module is definitely my time management skills. It took me a while to find my feet after starting back after the summer, and although we were warned before we finished for summer that we would 'hit the ground running', I just wasn't prepared for it at all. I do regret not preparing myself properly for this as it does mean I had to play a lot of catching up throughout the module in terms of the initial stages of the briefs, and I do feel that if I had managed my time better I could have gotten a lot better outcome at the end than what I have done.
Identify five things that you will do differently next time and what do you expect to gain from doing these?
BLOGGING! - I have probably said this for every module, but this one has given me a right shock this time as I found the technical explanations to be what are most important in this one and I do feel a bit like I could have gotten more in and better at it if I had done the blogging side of the module hand in hand with the designing and development rather than pushing it aside. The lesson has definitely been learnt this time.
Time Management - I didn't manage my time very well this time, and I do regret this as I do feel like I could have pushed the whole module a lot further than what I have done if I would have got my act together from the start. I will start to produce weekly time tables for myself along with the usual weekly google calendar to ensure I am keeping on top of things at all times from now on.
Research Skills - This was something I managed to develop a lot last year and realised the benefits of doing it, although I haven't really researched as much as I feel I could have for this module which I do think has left what I have done cut short a little, so I will ensure I produce more research back up to last years standards again in future modules.
Developments - I do feel that this is a strength within this module, and it will be something that I want to expand upon in future modules. I will ensure I don't touch a mac until I am fully happy with the drawn versions of what I am intending to produce. I have seen the benefits from doing this in this module, and I want to build on this more and push it further as I think it will help me to develop the overall quality of my work.
Motivation - I will make sure that I am a lot more motivated with upcoming modules. This point should work hand in hand with the time management point I have raised as it is basically the key to keeping on top of things, and it is the only way really to survive on this course and survive well so I will push myself further with this.
Attendance 5
Punctuality 4
Motivation 3
Commitment 3
Quantity of work produced 3
Quality of work produced 3

Showing posts with label OUGD201. Show all posts
Showing posts with label OUGD201. Show all posts
Tuesday, 22 November 2011
Good Is... - Final Pieces
When I have come to print my final pieces, the blue hasn't come out consistently as all together there has been three different printers used to print them out. I'm not really happy about this, but I have left it too late to get them printed so I don't have the time to go again and get everything done from on.
I am guessing that this is down to the colour that I have used being a mix of CMYK instead of specifically choosing a spot colour from the pantone swatches. I did this because I thought with me only going to be using digital ways of printing it wouldn't necessarily matter at this level, but obviously when it would come to commercial printing I would have specified the colour as I found one that was almost identical, and the only difference is the shade is the slightest touch darker. The pantone number for this is 299C.


I am guessing that this is down to the colour that I have used being a mix of CMYK instead of specifically choosing a spot colour from the pantone swatches. I did this because I thought with me only going to be using digital ways of printing it wouldn't necessarily matter at this level, but obviously when it would come to commercial printing I would have specified the colour as I found one that was almost identical, and the only difference is the shade is the slightest touch darker. The pantone number for this is 299C.


Good Is... - Design Boards
Here are my final 5 design boards that I have produced to submit along with my products for this module.


Good Is.. - Stock & Printing Considerations
Stock
In terms of the stock that I will use to produce each of the things that I have developed, although I think a gloss stock would work great as this is shiny and water is shiny, I will use 100% recycles matte stock to keep with the whole movement, wanting to make a difference in the world vibe.
For everything that I have produced basically I have used the card from the library to put together ready for submission, although if this was to go on to be commercially printed I would definitely use the recycles stock. I want it to remain a bright white stock as I have used. I came across a website that stocks both bright white card stock 100% recycled 215gsm, and premium white card stock 100% recycled 105gsm.


300 Stores
100 bags to each - 30000, litho printed, and die cut.
100 receipt holders to each - 30000, litho printed, and die cut
2 point of sale items to each - 600, digital printed, and die cut
Packaging/Delivery boxes - 1000, litho printed, and die cut
10 staff t-shirts to each - 3000, screen printed
In terms of the stock that I will use to produce each of the things that I have developed, although I think a gloss stock would work great as this is shiny and water is shiny, I will use 100% recycles matte stock to keep with the whole movement, wanting to make a difference in the world vibe.
For everything that I have produced basically I have used the card from the library to put together ready for submission, although if this was to go on to be commercially printed I would definitely use the recycles stock. I want it to remain a bright white stock as I have used. I came across a website that stocks both bright white card stock 100% recycled 215gsm, and premium white card stock 100% recycled 105gsm.

Basing what I have produced in conjunction with the brief, I will base the stock choice on these two stocks I have found as they are pretty much perfect for what I am wanting.
Items produced in the Bright white card stock 100% recycled 215gsm stock will be:
- delivery box
- outer case of delivery box
- price tags
- POS item
Items produced in the premium white card stock 100% recycles 205gsm stock will be:
- receipt holder
- carrier bag
- t shirt belly band
As for any stickers that would be produced, I have found a website with information on these. I would want them to be uncoated to tie in with the rest of the project.

So any stickers will be printed on a 90gsm uncoated sticker stock.
Printing
In terms of how I would get everything that I have produced printed, looking back to the blog post where I have discussed the amounts that I would get done if I was to produce things as if they were going to be available from Topshop, I will stick with how I have worked these out. Obviously there would be a lot more to what I have discussed as the plan for this is to have it appear within any store that wishes to participate in sponsoring the movement. So, the information I put together on the previous post, which can be seen by clicking here, is how I would get my things commercially printed.
It would be:
300 Stores
100 bags to each - 30000, litho printed, and die cut.
100 receipt holders to each - 30000, litho printed, and die cut
2 point of sale items to each - 600, digital printed, and die cut
Packaging/Delivery boxes - 1000, litho printed, and die cut
10 staff t-shirts to each - 3000, screen printed
Good Is... - Delivery Box Outside Packaging
I have decided that because the delivery box that I have produced is more packaging than a delivery box, I will produce an outside box for this for the actual box to go in that will have the address on. I have decided that I will keep this as simple as I can as it doesn't really need to say much. What I have decided though is to have on the back say that 'this order has just given 100 litres...' so that who ever sees the box on its way to the house that has ordered it then this will be seen by anyone handling it and maybe want to find out more.
For the net I made it so that the biggest part was about 1.5cm bigger than the actual box that is being used, and I changed it slightly so that the sides open the same as the carrier bag, and the top os just a little flap that folds back and seals. Here is how the final thing looks:

For the net I made it so that the biggest part was about 1.5cm bigger than the actual box that is being used, and I changed it slightly so that the sides open the same as the carrier bag, and the top os just a little flap that folds back and seals. Here is how the final thing looks:

Good Is... - T Shirt box Size Stickers
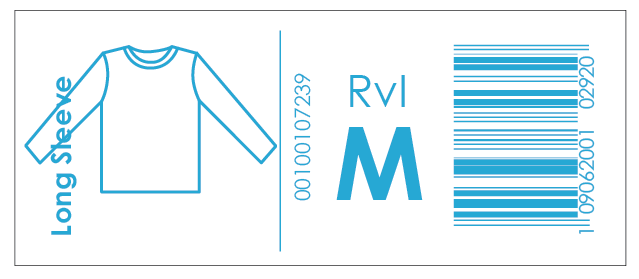
One thing I definitely think I need to include on the delivery box I have made is the size of the t-shirts. I have decided that instead of including this within the design of the actual box I will do this as a separate sticker that will go on the side of the box, that was the print run can be a larger amount in one go and will be cheaper as each one wont be tailor made resulting in more plates having to be made. They will be printed on to stickers, and each one containing a small illustration to show the style of the t-shirt, the name of it, a code for what store it is from, the size, product code, bar code and the water drop.
Before I started, I researched t-shirt styles to I could ensure I use the correct names on the stickers.

I read the descriptions carefully and picked out the ones that are most common (in my opinion), and wrote the names out that I will use.

Ensuring that I produced the correct illustrations, when I came to do each I did a quick look on google first to make sure I fully get what the description is saying. Using the basis of the simple t-shirt I used for the actual mock ups I did of t-shirts, I edited this accordingly so that they all are basically the same but with their own unique traits.

Next, considering what I will put on the actual stickers, I looked at a sticker that I had on a shoe box at the side of me (not the same I know, but gave me a good idea) and the next thing I decided to include is the store that the t-shirt is from. I think this is an important bit of information as they will be available from a variety of places. Instead of using the full names of these, or the logos which would mean stepping away from the spot colour I have selected, I just wrote down 3 letter 'codes' which are still obvious to what they are if you think about it. I did the list based on the number of stores of each information I looked at on the How Many? post.

Next is the size. For this I have decided to stick to the small, medium, large approach.

The stickers will also feature the water drop.

Also, a product code/number is always used on labels, so I just quickly typed out a few random combinations for these.

As well as these, I will include a barcode as I think it is a necessary thing to have.
I experimented and played around with this until I got one that I could see actually working on the box.


I decided to make the dimensions of the sticker have less length, which I think helps the design to look better.


Considering the side of the box and the fact that it is white made me realise i would make more sense to have the backround of the sticker blue so that it stands out more.

This is how the final stickers will look, but obviously each with individual sizes and styles of t-shirts.

Long Sleeve
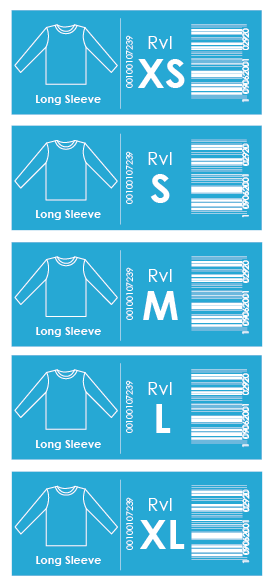


I printed these out on to sticker paper, and cut them out ready for module hand in.

Subscribe to:
Posts (Atom)